Ways to install windows 7 on your android tablet. How to use the phone as a boot disk for the computer
- List of tablets on which you can install Windows 7 or 8
- Step-by-step guide how to install Windows on Android tablet
- How to install Windows on the tablet. Installation process:
Tablets are becoming popular every day, displacing netbooks and communicators from the market. Most tablet models run on two popular systems: iOS (as is the case with the iPad) and Android. Despite all the useful functions, not every user prefers one or another of the operating systems listed above. And recently, tablet owners often wonder: how to install Windows 8 or 7 on a tablet. To a greater extent this applies to users of the Android OS.
It would seem that it is impossible to install these computer operating systems on the tablet because of a completely different software “stuffing”. However, there are a number of some tablet models in which you can embed the familiar “Windows”.
Let us first discuss the question on which tablets you can install Windows. Not all models can be subjected to a similar operation. First of all, before installing it is necessary to read specifications devices. The tablet should have an i386 or ARM processor architecture. In the second case (ARM) it is possible to install only the “eight”, with i386 both installation options are possible. But in no case try to install Windows XP!
List of tablets on which you can install Windows 7 or 8
Odeon TPC-10
- ViewSonic ViewPAD
- Iconia Tab W500
- Archos 9
- 3Q Qoo
Step-by-step guide how to install Windows on Android tablet
What tools and programs are required for this: a USB mouse, a USB keyboard, and a USB hub (in the case when the tablet has less than 2 usb ports) and a bootable flash drive with Windows system. The hub is an adapter that includes several "branches" of USB-jacks.
How to install Windows on the tablet. Installation process:
1. Getting started, connect the hub to the USB and insert the USB keyboard with a flash card into it. When the system starts to boot, we press the F2 button on the keyboard to enter the BIOS settings (note that everything is the same as with the normal Windows boot on the computer).
In the BIOS settings you need to define the first boot device - select the USB flash drive. After this we perform a reboot, having previously saved the setting in the BIOS (F10 key).
3. Stage formatting disks. We delete the current disk, create a new one and produce its formatting.
4. After installing the system, pull out the flash card. The username can be entered already from the tablet using the on-screen touch keyboard. Installation completed!
Similar manipulations are made with the installation of the "eight", there are no fundamental differences. It is important to know that Windows drains the tablet battery much faster. In addition, the tablet can "slow down" during operation.
Important: sometimes the USB hub is not immediately determined by the tablet device, and if your tablet has only one USB port, in such a situation you have to be cunning: before loading the BIOS (before windows installation ) first insert only the keyboard into the tablet. Then, after saving the BIOS settings, remove the keyboard wire and insert the USB flash drive.
When installing the system, reaching the choice of language, you need to pull out the flash card and insert the mouse to perform manual settings installations. After clicking "Install", change the mouse to the USB flash drive. When the “License Agreement” item appears, change to the mouse or keyboard again. If in such a situation you are suddenly confused, nothing terrible - just restart the system and continue from the stage where you stopped.
Author:
We did not even have time to get used to the fact that optical data carriers are irrevocably a thing of the past, as the menacing clouds begin to thicken over flash drives. The rapid development of cloud file storage makes it useless to use usb sticks to transfer digital data between computers. In other cases, mobile devices can perfectly cope with this task, the size of the disk space of which all continue to grow.
Therefore, more and more often it turns out that the flash drive remains a sad fate to be brought to light only when we need another reinstallation of the system. However, the DriveDroid utility deprives them of this and that - now you can install the system on your PC right from your phone.
DriveDroid is an application for devices under running Android which allows you to use your phone as bootable media to boot the computer using ISO or IMG disc images stored on the phone. This may be convenient for you for several reasons. Maybe you want your service toolkit for treatment, maintenance and repair operating systems was always with you. Maybe you will need to reinstall the system, and there is nothing else but a mobile at hand.
First of all, it should be noted that the DriveDroid application is running Android 2.2 and higher, requires root privileges. In addition, your device must support USB Mass Storage technology and, of course, you will need a cable to connect to the computer.
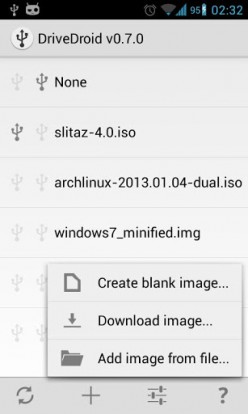
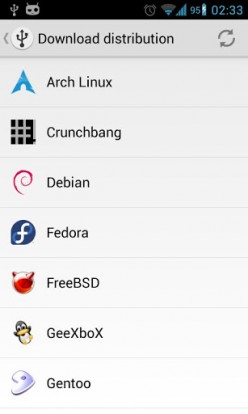
After starting the application, you have the opportunity to create an empty image, download a disk image from the network or add an existing one. Several popular Linux systems are available for download. Once you have specified the program to an existing image boot disk or downloaded it from the Internet, it becomes possible to download your computer from it. Just ask in BIOS settings as the first boot USB device and reboot the system.
Despite the fact that the creator of the utility has paid more attention to the possibility of using Linux-based systems, it’s still possible to install Windows in such an unusual way. A detailed guide on this is located.